In Part One, I covered how I pencil hand-drawn comics (on the relatively infrequent times that I get to do them). Next comes inking.
I left off with the finished pencils. I scan those in and print them out again onto Bristol board so that — if I screw up a page (or panel) irretrievably — I can print out a new page and take another shot.
I ink with a Winsor & Newton Series 7 #2. I’ve used cheaper brushes, but they’ve all lost their points much more quickly than some of my oldest Series 7’s. I’m sure there are other, good brands for cartooning, though; I’ve just never used one. I’ll occasionally use a #1 for smaller details (although oftentimes, it’s just as easy — or even easier — to use the larger brush), and I often pull out the old Microns for the dots of characters’ eyes or other small details where an even line doesn’t hurt.
If a brush gets a stray hair that will just not get back into shape, I use a cuticle trimmer and snip the stray hair out at its base. It keeps my brushes in active duty a lot longer.
One of the things I can never quite get the hang of with digital inking is turning the Cintiq in order to get the best line of attack on a line, like you can with a physical page. Clearly, other people don’t have this problem, so don’t take that as some sort of argument that traditional techniques are better than digital. (And, y’know, it’s me. I draw Multiplex. Obviously, I don’t have a problem with digital art.)
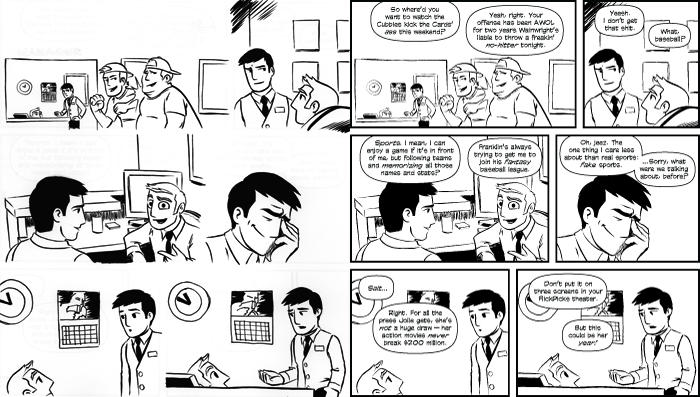
I generally avoid using a ruler at any point when I ink, because I like my inks to look organic (or maybe I’m just lazy). With this strip, I left the panel borders and lettering for the computer, so you can see that I just ran my lines off into the gutter and off the page; they’ll get masked off after I scan the inks in.
I keep two jars of distilled water at my table: one for my bleedproof white brush, and one for the India ink. I use Speedball, but tend to let it sit out and evaporate a bit to thicken up before I use it — if it gets too thick, I add some distilled water. I use Winsor & Newton Bleedproof White, which will solidify after sitting around in the jar, but you can just add some distilled water and stir it up and it’ll bounce back (even after months and months of sitting around).
As a leftie, I should, but I forget this a lot and end up smudging my inks sometimes. So, out comes the bleedproof white, and I’ll fix any smudges and do some light touch-ups before I scan in my inks.
Below, you can see my inks without the letters and borders (left) and then with them (on the right). Apparently I forgot to ink the word “Manager” above the Manager’s Station and the movie poster frame behind Jason in the last two panels. Oops.

Next comes the retouching. Some things you can fix more easily with bleedproof white and a little re-inking; other times, you need Photoshop. My hand isn’t especially steady, so I almost always use Photoshop and my trusty Cintiq to do some touch-ups on the final inks. I kept that to a minimum on this page, only straightening out the top of the Manager’s Station in the first panel, moving Kurt’s head down a little in the second to last panel. If I’ve forgotten to ink anything, I’ll tend to do it digitally, rather than scan in my inks again.
At this point, I’ll add in the balloon pointers and call it a day (unless I need to color it, which I’m not doing for this strip).
After the cut, you can see how the finished page looks.
